

Introduction: How to Make a Push Button Switch


Hello Friends,
Here is a very fun project, actually I needed a push button for one of my projects but the market store was closed that day. So I thought to make one of my own. Many times we want to make something of our own which could be used to anywhere else. In this instructable I made a very simple DIY push button which you could use in any other tools or equipment as a switch.
So, here I will show you how to make all parts very easily with all available materials at your home.
So stay tuned.
Step 1: The Design Blueprint

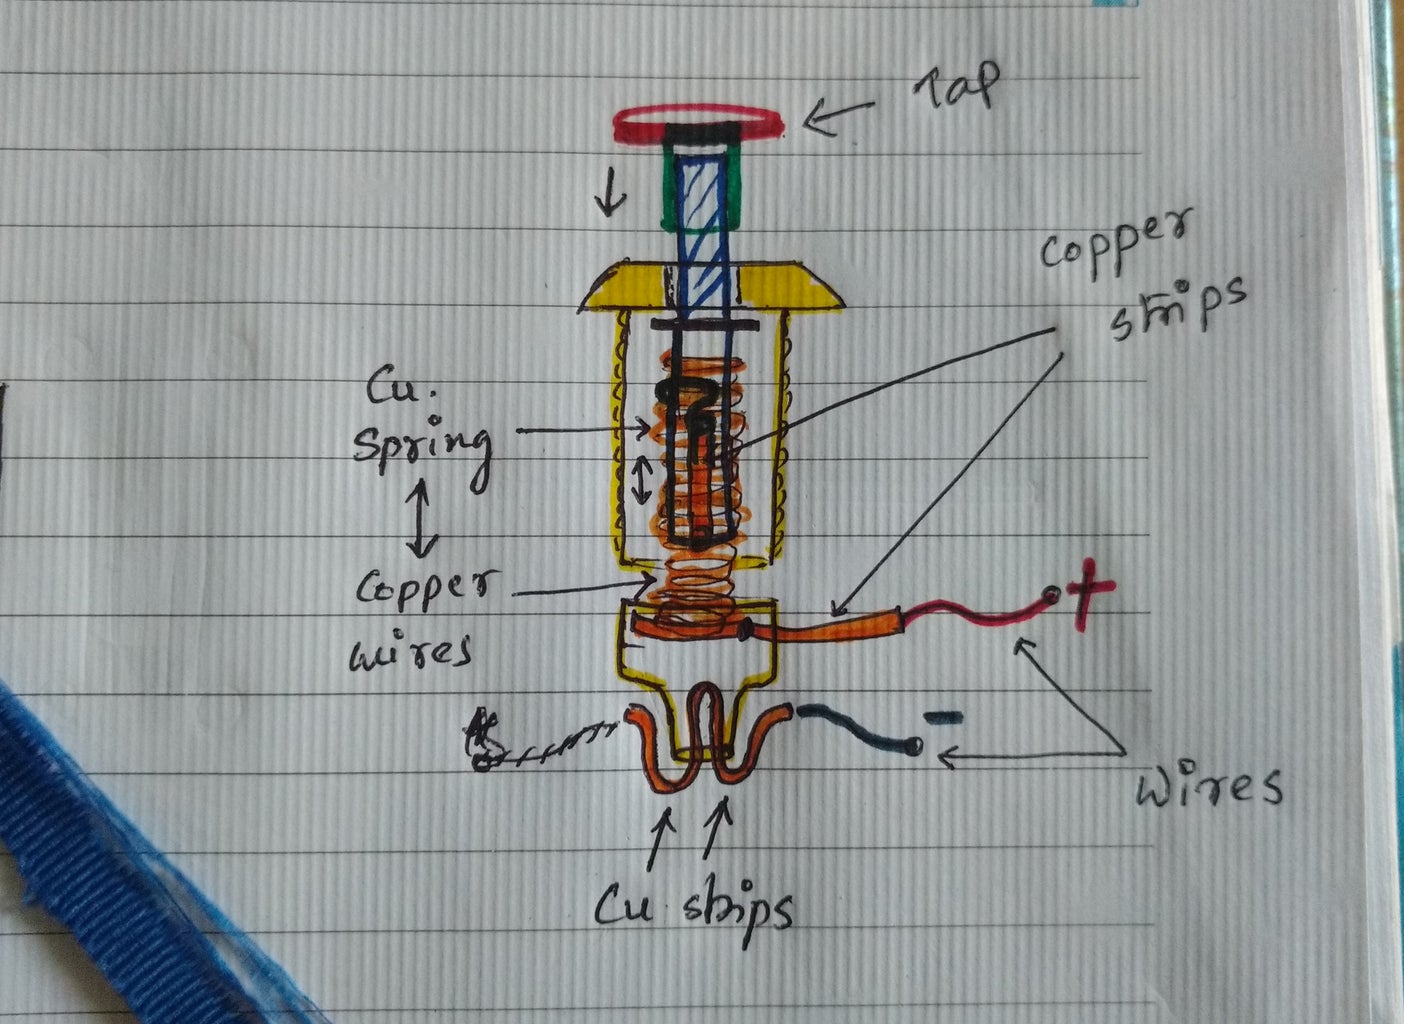
A sectional view is shown here with a diagram.
How all the parts are connected and the contents so, it will get easy to understand clearly that whats the inside mechanism will be.
Step 2: Materials You'll Be Needed


Here is all the parts that you will be required,
1. Plier
2. Pen knife
3. Copper strips
4. Copper wire
5. Superglue ( fevi kwik )
6. Empty pen refill
7. Pen cap
8. Some wires
9. Soldering iron
10. Sketch pen
Step 3: Inner Mechanism


In this part i made the inner mechanics with the empty pen refill, copper strips and copper wire.
So, firstly take a small piece of copper strip, then take some copper wire and make a loop around the strip and then insert it in the empty refill piece.
Some wires will be coming out from the refill which will act as joining connection later.
Check the first step diagram for better understanding.
Step 4: Body and Other Parts


In this step I will show that how I made the body part and fitted the inner part.
So, first take some copper wire and turn around a refill and make a spring or you could use a normal spring which fits in your size.
Now, Insert the inner part in the spring so that the wire coming out from the inner piece touches the spring.
Then insert the whole assembly vertically into the white body part but don't glue it, it will act freely.
Also cut a small piece of refill and glue with a round paper piece and insert in the top touch tapping part.
Step 5: Make the Bottom Part


In this step I used the bottom part made from a pen cap as shown in figure.
Now, take some copper strips and bent it vertically and insert through the bottom cap.
Also cut a hole in the top part and insert another copper strip and bent it around the inner corners so that it touches the spring. ( it is shown in figure )
Step 6: Joining and Wiring


So, we have made all the parts we needed.
Now, take the upper assembly part and settle it into the bottom part, so that the spring fits nicely and glue it using super glue or fevi kwik.
Also, tap some black tape and insulate the lower end.
Here we will get two terminals coming out from the base which will be used in joining the wires.
Now take some wires and soldier it to both the terminals or simply wind around, but soldering would make it stronger.
Step 7: Finalizing & Testing


So, our product is ready for testing now.
Take a 5w LED light and a 220 ohm resistor and connect it through the switch and plug it into a dc adapter or a phone charger.
Now turn on the switch and tap the push button, the LED will glow.
This means your switch is now ready for use, congrats.
Now color the switch using a Red pen marker and you are done.
_____
Thank You Everyone!
Hope, you all have liked this Instructable and learnt something as well.
If so, please Follow us, also SUBSCRIBE to our YouTube channel "technocraft STUDIO" for more amazing contents like this.
_____
GET IN TOUCH
Facebook : https://www.facebook.com/TechnocraftStudioPage/
Instagram : https://www.instagram.com/technocraftstudio/
YouTube :https://www.youtube.com/c/technocraftStudio


8 Comments
4 years ago
The video in step 3 is not working.
Reply 2 years ago
sorry its been removed, you can refer to the video for the same
Question 5 years ago on Step 2
What type of sketch pen is that and what part/type is that pen refill?
Answer 2 years ago
any as your size, you can use a gel pen refill
6 years ago
Top points for ingenuity! (but much easier to just salvage buttons from other things). Thanks for sharing!
Reply 2 years ago
you r welcome
6 years ago
my vapourizer needs a 5volt 30amp small as possible momentary mechanical switch. N.O. Has to be reliable too. Zero loss as possible. the load can be lower than, say the 0.2 ohm coils that are on my normal vape. If the switch sticks, or is too easily pressed it could fry the battery quite quickly.
Good work. If I end up frankensteining myself this switch i will post here.
Reply 6 years ago
Yes, this is for normal uses in your equipments, btw i could not get your question. if you need anything please comment.
Thank you